The Blind Leading The Blind: First Foray Into AWS For Blog Hosting
When I initially built this blog, I used it as an opportunity to learn/teach myself a little bit about static sites and how to use markdown. The learning experience was positive but by the end, I was drained and just needed an easy button to get it hosted and working. I opted to host the source files in Gitlab and use Netlify to perform the Continuous Integration and Continuous Delivery (CI/CD) and host the actual site. This was largely a turn-key solution and only required a few DNS and SSL tweaks to get working.
Do I have a reason to move away from this solution or is it failing to meet my needs? Not at all. That being said, sometimes you want to take a peak behind the curtain and have a slightly better understanding of what is going on to deliver the product you are utilizing. What better way to do that than by rolling up your sleeves and doing it yourself? However, when it came to cloud-related topics I had only the most surface level knowledge. Thankfully, I was able to string together bits and pieces from several blogs and the the AWS documentation to move my blog off Netlify to AWS. The below steps are my attempt to document how I am now hosting a static site with an S3 bucket, Cloudfront, and Cloudflare.
Background
Before I get too far it is necessary to be upfront with what this content is not. This won’t be a full primer on static sites, how to employ them, use themes, etc. There are a lot of great guides out there and honestly most of the repositories hosting the themes are fairly beginner friendly. Specifically, my first theme and how I dipped my toe in to static sites was with beautifulhugo and I highly recommend looking there if you need to start from the beginning.
Next, it’s important to discuss the context surrounding my choices and configurations. For one, before I made the transition to AWS, I moved my blog source files to a local Gitea instance. Why a local git server over Github or Gitlab? No reason other than I do enjoy the idea of self-hosting when it makes sense. Also, I use Cloudflare to route any traffic destined for my domains and wanted my solution to allow me to continue to do that.
Step Zero
Create an AWS account and create a new user since utilizing your root account for everything is not advised; I gave mine Administrator permissions and used it for everything that follows. This is fairly straightforward but if you want some quick pointers their documentation is pretty solid.
Step One - Get Code In AWS CodeCommit (Optional)
If you’re using Github or Bitbucket this step should be optional as there is an option in a later step to utilize those code repositories natively. Since I am keeping my blog in the local git repo I needed to get my code into CodeCommit automatically each time I made a commit so that the newly changed source files are available in CodeBuild during the build pipeline. To do so, I used a post-receive Git Hook to mirror the repo. Unfortunately, this required leaving hard coded credentials in my Gitea instance since it does not have a native integration for this type of capability. As such, I made another user for my AWS account and gave it the least permissions possible and the only credentials associated with it are for HTTPS git commands.
Step Two - Make S3 Bucket
Next, we need a place to put our website files after they are generated by Hugo. An S3 bucket is a perfectly usable place for this since they are static and don’t change. Create an S3 bucket with a name mirroring that of your site URL. For me, that was blog.murchie.me. I left all of the configuration options un-checked.

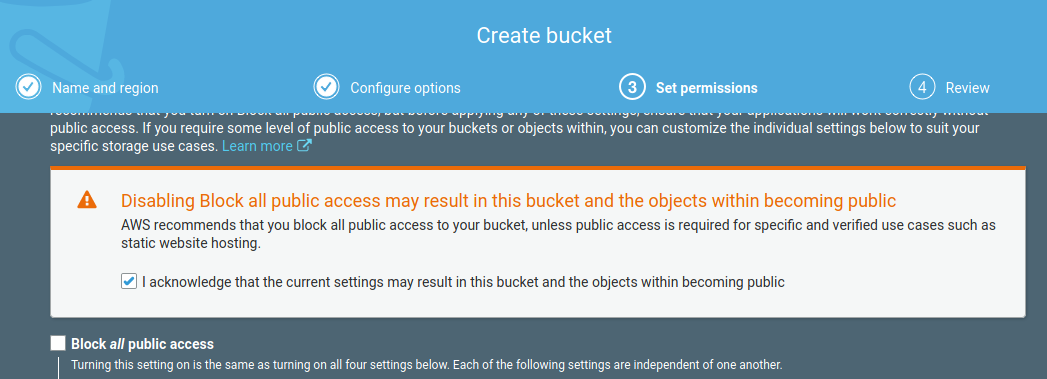
On the permissions page un-check “Block all public access” and check the acknowledgement box. This is a public facing website after all so this is an expected configuration.
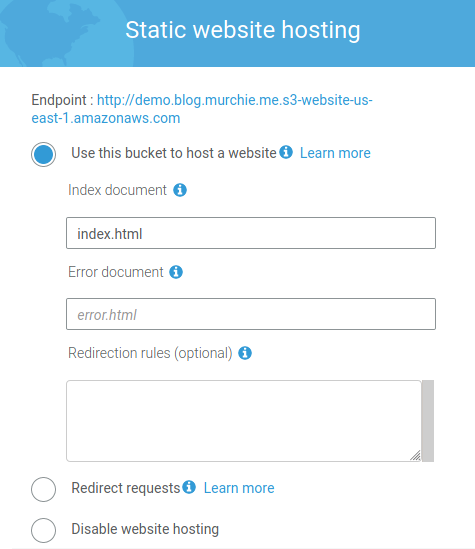
Lastly, once the bucket is created, go into your bucket configuration and utilize the Properties tab to enable static website hosting. Enter “index.html” as the Index document and while you’re here make note of the endpoint URL. We’ll be back to configure some additional bucket options later.
Step Three - Make CodeBuild Project
Head over to CodeBuild, create a build project, and name it whatever makes sense for you. Scroll down to the “Source” section and select “No Source” as we will configure the source later when we build the CodePipeline.
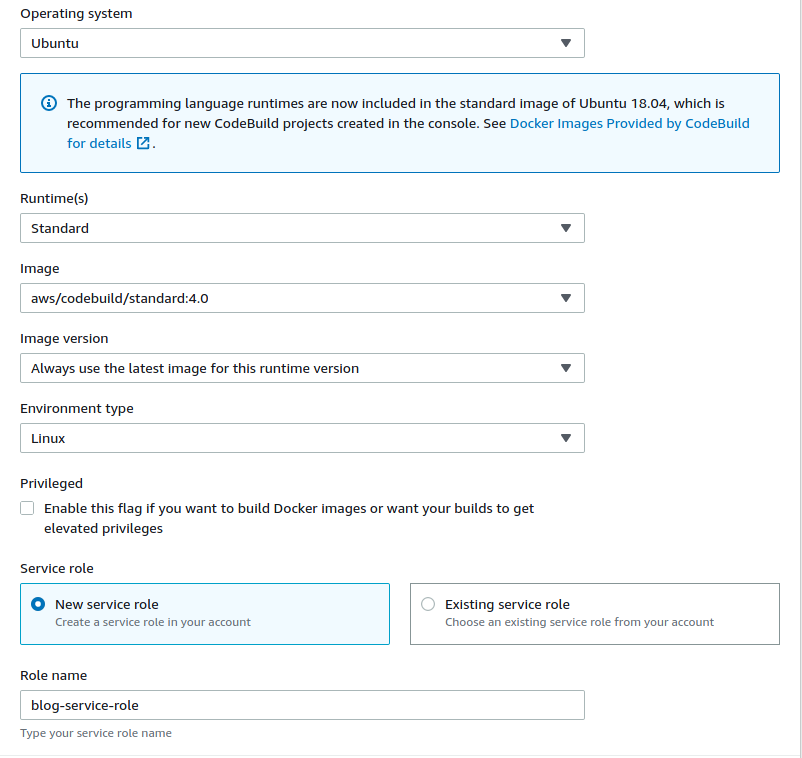
Within the “Environment” section used a managed image and select Ubuntu, standard runtime, standard:4.0 image, always use latest image, and linux as the environment type. The role name was auto-populated for me so I left it at the default.
The “Buildspec” section is where we are going to borrow from the actual AWS blog regarding building with Hugo. Select “Insert build commands”, switch to the editor, and paste in the code block below. This is the same code from the linked blog with a slight adjustment to pull the current latest version of Hugo as of this writing (v0.74.3). The code is performing the actual building of the website files from our source files and tells our Ubuntu environment to install Hugo, build the website, and publish the new files to the “public” directory.
version: 0.2

phases:
  install:
    runtime-versions:
      python: 3.8
    commands:
      - apt-get update
      - echo Installing hugo
      - curl -L -o hugo.deb https://github.com/gohugoio/hugo/releases/download/v0.74.3/hugo_0.74.3_Linux-64bit.deb
      - dpkg -i hugo.deb
  pre_build:
    commands:
      - echo In pre_build phase..
      - echo Current directory is $CODEBUILD_SRC_DIR
      - ls -la
  build:
    commands:
      - hugo -v
artifacts:
  files:
    - '**/*'
  base-directory: public
Almost to the finish line for this portion! Inside the “Artifacts” section leave the “Type” set to no artifacts. For the “Logs” section I chose to disable CloudWatch for the time being since I wasn’t sure what use I would have for it at the moment.
Click build project and you now have a CodeBuild project!
Step Four - Configure CodePipeline
It may be somewhat backwards to configure the CodeBuild before the CodePipeline, however, I found that creating the “guts” of the Pipeline first was easier for me.
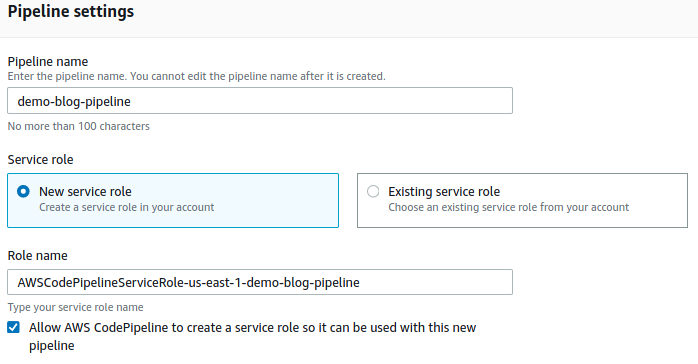
Jump into CodePipeline and create a new pipeline and give it a name. I needed a new service role and kept the default name it generated for me.
Click next and select where you are keeping your source files. As mentioned earlier, I use CodeCommit but if you’re using Github or Bitbucket you can select those options and connect your account. Select your repository and the appropriate branch (likely master).
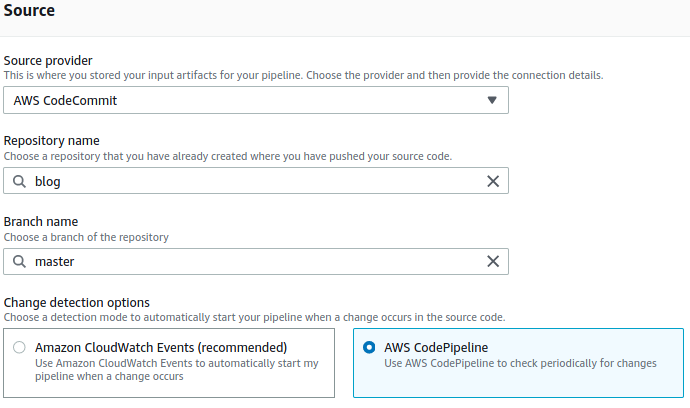
For the next portion we already did the heavy lifting. Select “AWS CodeBuild” as the build provider and pick the name of the CodeBuild project created in the previous step. Single build should be populated by default but if not select it and move forward.

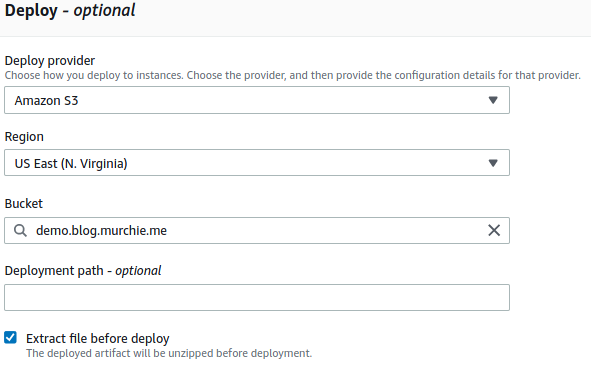
Again, on the next page, we already did the heavy lifting by having already created our S3 bucket. Select S3 as the deploy provider and pick the appropriate bucket. Also, ensure to check the “extract file before deploy” to ensure the website source files aren’t zipped when deployed to the bucket.
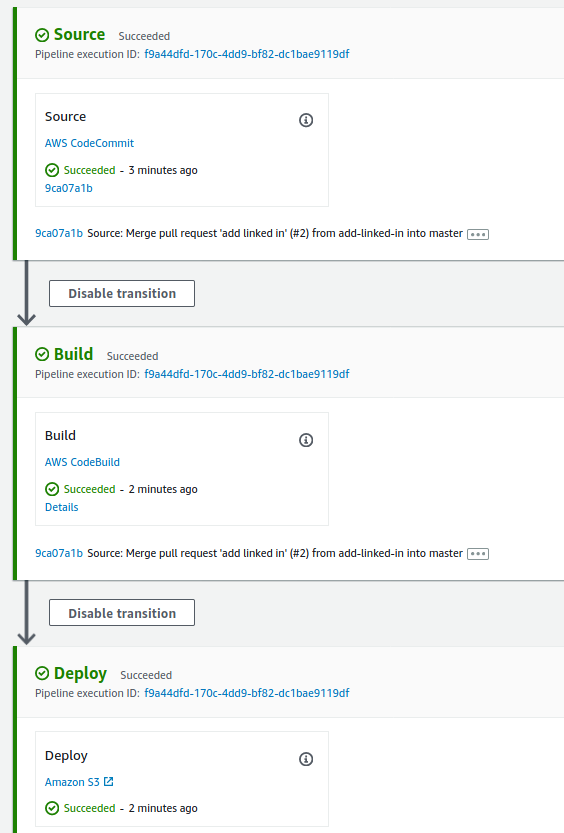
Create your CodePipeline and if everything went well you should be auto directed to a page that looks like the following:
Step Five - Configure Cloudfront
This step is optional if you are fine with only being able to access your site over HTTP since that is the only protocol supported by S3 when using your own domain name. For a blog it really isn’t dire to have HTTPS since there shouldn’t be sensitive data traversing the wire. But what kind of cybersecurity blog would this be if I didn’t implement HTTPS? To do so requires using Cloudfront as the termination point of the SSL/TLS connection at Amazon’s boundary where the rest of the connection will be HTTP within Amazon’s environment to the S3 bucket.
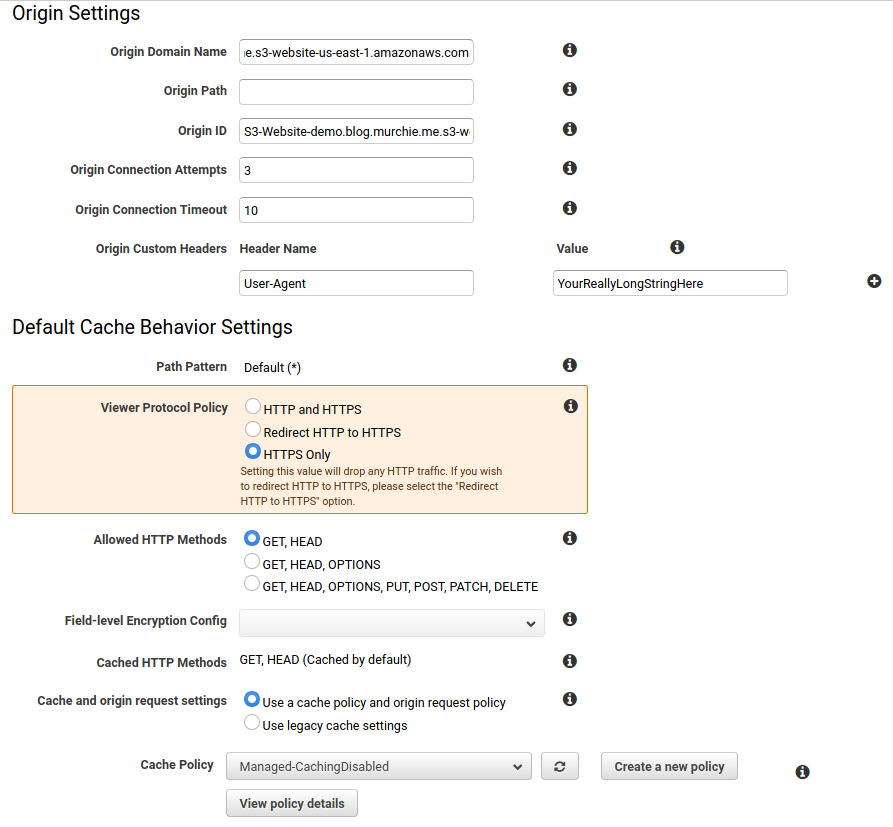
Navigate to CloudFront and create a new Distribution for Web. When you click the Origin Domain Name field you will be given some pre-filled options but don’t select these. Remember the static site URL from the S3 bucket that we copied? Paste that in the field (without the http://) so the text should look something like demo.blog.murchie.me.s3-website-us-east-1.amazonaws.com. This will pre-populate the Origin ID field so leave it at the default.
Now, we need to put in an “Origin Custom Header”. Why? It would be preferable to lock down access to the bucket to only people visiting your static site’s custom domain as opposed to scraping public buckets. When someone visits your custom domain and hits CloudFront this field will be appended to the HTTP request. Later we will lock down the S3 bucket so only requests with this appended field are allowed access. Note, I found this tip here.
As with using HTTPS is this really necessary, especially for a blog or other nonsensitive site? No, but it makes me feel warm and fuzzy so I’m doing it. Enter “User-Agent” for the Header Name and enter a long, random string into the value. In Cache Behavior Settings I chose HTTPS only and disabled caching since Cloudflare should be caching for me.
So far it should look something like this:
Leave everything else alone until the SSL Certificate section. We are going to let CloudFront provision a certificate for the site domain so we can establish a secure connection. Click the Request or Import a Certificate with ACM button and follow the wizard to provision the certificate. If you select DNS validation you will need to create a TXT record on your name server, Cloudflare in my case, so that Amazon can determine you own the domain for which the certificate is being requested. Once the certificate is generated and the validation occurs (was within a few minutes for me) you can select the “Custom SSL Certificate” radio button and choose the certificate that was just generated.
I chose to leave all the remaining settings at their defaults then created the Distribution. This took a few minutes to provision so give it some time. Make note of the “Domain Name” cloudfront has generated for you for the next step.
Before we leave the AWS console navigate back to your S3 bucket. Go to the “Permissions” tab and click on the “Bucket Policy”. Enter the below snippet into the bucket policy making sure to change the domain to your custom domain (don’t remove the /* at the end) and enter in the long string you created in CloudFront as the value for the UserAgent key. As discussed above, this will lock down access to the bucket to any requests not originating from CloudFront (i.e. not from your custom domain or the domain CloudFront is going to provision for you).
{
    "Version": "2012-10-17",
    "Statement": [
        {
            "Effect": "Allow",
            "Principal": "*",
            "Action": "s3:GetObject",
            "Resource": "arn:aws:s3:::demo.blog.murchie.me/*",
            "Condition": {
                "StringEquals": {
                    "aws:UserAgent": "yourreallylongstringhere"
                }
            }
        }
    ]
}
Step Six - Configure Nameserver
Almost to the home stretch. Now all that needs to be done is setting a CNAME record for your custom domain to the CloudFront domain that we made note of in the last step. Once you’ve done that, if everything went according to plan, you can get to your static site!
Conclusion
I learned a lot about AWS and definitely feel like I dipped my toe into the pool, so to speak. Of course, there’s still a lot to learn and I cannot truly say I fully understand everything I did and configured. Hands on learning has definitely been the best approach for me as I grow as a professional and when I can take on projects that I care about and legitimately want to do it is a big motivator when it comes to spending time troubleshooting and reading documentation.
Lastly, if you are curious about the cost of such an endeavor, so far this solution has cost me nothing but I anticipate minor costs down the line of maybe a few dollars a month. That is worth it in my particular situation for the overall learning experience.