Beginner Malware Analysis Series: Make Your Own Analysis VM
If you’re new to the world of malware analysis and reverse engineering the idea of building a fully customized Virtual Machine to use in your endeavors may be somewhat daunting. “What software should I install? What are some good scripts to use? How do I keep myself safe when handling live malware?” are all legitimate questions. Thankfully, it has never been easier to get up and running thanks to Microsoft’s “generosity” and the great people contributing to the FireEye FLARE-VM project.
Step One: Get a Windows VM
Windows licensing is the great mystery of the universe and if you’re like me, you probably haven’t sunk a lot of money into keeping spare Windows 10 licenses laying around to use for your projects. While you can certainly grab a Windows 10 installation ISO from Microsoft to build a VM and never activate it, this isn’t exactly the most ethical solution and one I couldn’t publicly endorse cough cough. Instead, I would suggest taking advantage of the Windows 10 development environments distributed by Microsoft.
Wait, development environment? I'm here to reverse all the malware!
Yep, Microsoft has free, publicly available VMs for people that want to develop for/on Windows. These VMs are Windows 10 Enterprise already installed and distributed in virtualization formats for VirtualBox, HyperV, VMware, etc. Once booted, they are only activated till whatever date is displayed on that page (the date rolls periodically, as of this writing it’s October 13th), however, there are anecdotes that it may be possible to re-arm them several times. While it is annoying to have to perform the installation steps again later, you get what you pay for.
Step Two: Download FLARE-VM
FireEye’s FLARE-VM is not a VM in itself but rather a PowerShell script which will download and install a curated list of tools and analysis scripts the members of the FireEye Labs Advanced Reverse Engineering (FLARE) team think are important enough to be included in a malware analysis environment. Technically, the project includes other tools targeted for penetration testing and incident response but the malware analysis tools are fairly comprehensive.
Once you have downloaded your VM from Microsoft and booted it grab the install.ps1 and save it. Start an Administrator level PowerShell prompt in the directory the script resides and use Set-ExecutionPolicy Unrestricted in order to allow for scripts to run. Next, launch the installer script with .\install.ps1. Grab a bite to eat and relax because the installer isn’t winning any awards for speed but that’s due to the large amount of software it is downloading and installing on the fly.
Once the script finishes you can reboot and behold your newly minted analysis VM.
Note: There are some reports that Windows Defender is not being properly disabled by the script when run in a Windows 10 environment. It may be prudent to take the following step prior to running for the first time: Click the Windows Defender icon in the system tray, click on the “Virus & threat protection” tile, “manage settings” under the “Virus & threat protection settings” header then toggle “Tamper Protection” to off.
Step Three: Make a Few Tweaks
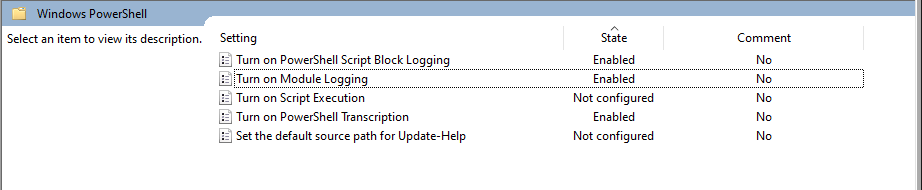
Now that you have all the tools and scripts your heart could ever desire it’s time to make a few tweaks to make your life easier. We need to enable PowerShell transcription logging, script block logging, and module logging. Why? PowerShell is a massive attack vector and these logs will make seeing and understanding what malware that employs PowerShell much easier. FireEye has a great tutorial on how to do this but it isn’t difficult, you simply need to use the local group policy editor to point and click your way to enhanced logging.
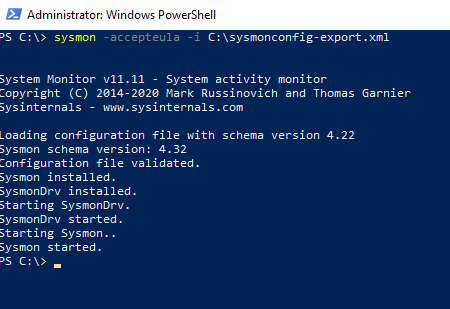
Similarly, we are going to install Sysmon to get vastly superior logging capabilities compared to the plain-jane Windows event logs. Grab the Sysmon binary (we want the 64 bit version) and drop it somewhere that you will remember. The root of the C:\ drive isn’t a terrible idea. Then we need a well configured Sysmon configuration file to tell Sysmon what to log and what not to. SwiftOnSecurity has a good one to start with but there are quite a few from respected InfoSec professionals that will suffice. Drop the XML file in the same directory as the Sysmon binary, open an Administrator level PowerShell shell and navigate to where you placed the Sysmon binary and execute the command sysmon -accepteula -i C:\where\you\placed\the\config.xml.
Boom! You know have awesome tools and robust logging. Take a snapshot of your creation and name is something logical like “Clean” or “Fresh” so you will know that this is a snapshot with all the tools that is in a state unaffected by malware.
Step Four: Stay Safe
You have a shiny new malware analysis VM and you’re ready to start tearing into samples, but how do you keep from infecting yourself? In general, keep your network adapter set to private or host-only (the verbiage depends on your hypervisor). This will keep detonated samples from successfully contacting the internet and pulling down additional stages that may contain functionality you cannot predictably control. Moreover, some samples will attempt to spread to your local network and infect vulnerable hosts and you’ll probably have a bad time if you need to perform containment, eradication and remediation for your significant other’s or children’s devices.
Moreover, while this may be overkill, if you can run your analysis VM in an opposite host OS this can reduce the potential impact of a VM escape. That is to say, since this is a Windows VM, running it out of a Linux or Mac based host would be ideal but definitely not required.
Last, enable drag-and-drop and copy-paste sharing functionality on a limited basis. This is probably more paranoia than anything but adding extra avenues of interacting with your host increases the potential for nefarious activity to escape where you want to keep it safely contained. Enable it to drop a malware sample in your environment then disable it before execution.
Step Five: Go Forth and Analyze Teh Malwarez
I’m going to add some follow-on posts with high-level overviews of how to conduct analysis. Regardless, any other overviews/guides on YouTube or other blogs will still require the right tooling and now you have it!